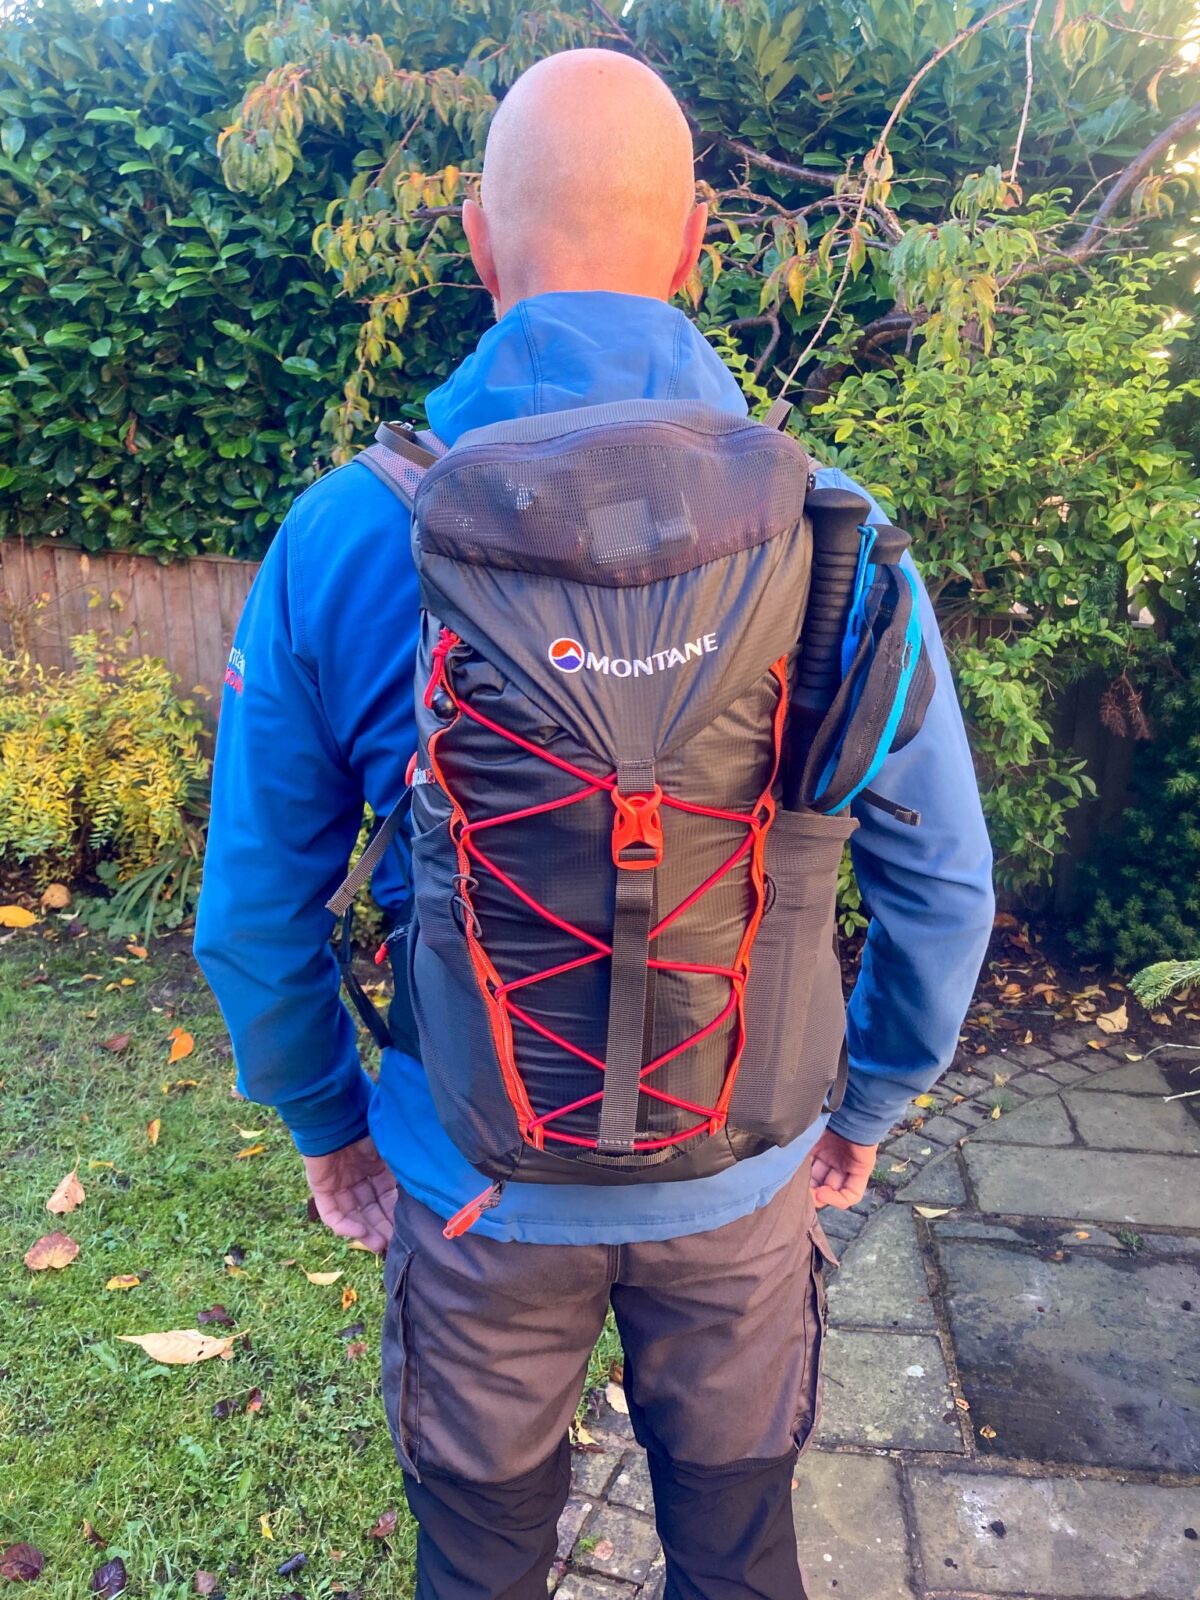
A lot of potential Spine event participants ask about kit – it’s a huge subject. Here, I’ve listed the mandatory items that have to be carried and the specific articles I used. At the end, there’s an additional list detailing the extra kit I felt I needed to cope with the vicious Winter conditions encountered on the route, plus stuff in the drop bag to make check point life easier.
Clothing and shoes worn at the start:
Scarpa Ribelle Run Kalibra G trail shoes*
Sidas 3Feet Mid footbeds
Montane Phase Light waterproof jacket*
Rab Firewall waterproof trousers*
OMM Core Plus Hoodie
Montane Terra trousers*
Helly Hansen Lifa Stripe crew long sleeve top (base layer)*
Paramo Cambio boxer shorts (underwear)
Bridgedale Lightweight Merino Comfort Boot socks*
Bridgedale Knee Length Midweight Storm socks
Rab Filament beanie
*Mandatory (generic) item
And carrying:
Black Diamond Distance FLZ carbon running poles
Mandatory kit applying to every competitor:
Montane Trailblazer 30 pack modified to carry OMM Chest Pouch
(Exped 50 litre rolltop waterproof pack liner)*
Silva Expedition 4 compass
Harvey’s North and South maps of Pennine Way
Garmin eTrex 32X GPS
Orange Marine Safety whistle
Bolle Cobra safety goggles with strap
Fenix HM65R-T v2.0 headtorch
(SPARE Fenix 4,000 mAh battery)*
Montane Logo Beanie hat
Montane Power Stretch touch gloves
Montane Montane Respond Dry Line insulated waterproof gloves
Montane Montane Respond Dry Line insulated waterproof mitts
SPARE Bridgedale Lightweight Merino Comfort Boot socks
Buff neck warmer
Montane Dart XT long sleeve top (base layer)
Montane Dart XT long johns (base layer)
Rab Photon insulated jacket
Kahtoola Microspikes
Summit to Sea Spark II sleeping bag (superseded by the Spark Ultralight -1)
Alpkit Numo sleeping mat
Alpkit Hunka bivvy bag
Alpkit Kraku stove
Alpkit MytiMug 400ml titanium mug
MSR Piezzo stove lighter
MSR Folding Utensils Spork
iPhone SE in Ortleib waterproof pouch
Alpkit Tau rechargeable red LED light
The Tent Lab Deuce titanium trowel
Toilet kit – Dog waste bags and tissues
Medical kit/personal first aid kit with scissors as specified by Spine medics
(Various Exped rolltop waterproof bags)*
Platypus Platy 2 litre bottle
(Montane Water Ultraflask 500Ml with long straw top)*
(Salomon Soft Flask XA Filter 490ML)*
Food as specified (1,500 calories) including SIS gels
*Items in brackets not mandatory but virtually essential
Extra stuff in drop bag or carried in addition to the above mandatory kit: Montane Phase XT waterproof jacket
Rab Sil Poncho
Rab Bergen waterproof trousers
Montane Minimus lightweight waterproof trousers
Rab Generator insulated jacket
Rab Vapour-Rise Alpine Light Jacket
Montane Slipstream thermal running tights
Scarpa Ribelle Run Kalibra G trail shoes
Scott RC running cap
Black Diamond Distance Z aluminium running poles
North Face Pamir Windstopper gloves
Montane Extreme mitts
Victorinox Alox SD knife
Apple iPod shuffle plus headphones and charging cable
Alpkit Juice Boost 5,000mAh power bank
Adaptors: USB C to Lightning, USB Micro and Garmin Fenix (from Amazon)
Rossignol face mask (otherwise in drop bag)
Paracetamol and codeine sufficient for the duration
Vaseline lip balm
Gurney Goo for rubbing areas and potential blisters
SPARE Montane Power Stretch touch gloves
SPARE Montane hooded long sleeve top (base layer)
SPARE Paramo Cambio boxer shorts (underwear)
SPARE Bridgedale Knee Length Midweight Storm socks x 3
SPARE Bridgedale Lightweight Merino Comfort Boot socks x 3
SPARE foodstuffs to top back to 1,500 calories at CP’s
SPARE SIS gels
SPARE laces (already attached to compass and whistle in pack)
SPARE Petzl Swift headtorch
SPARE Petzl Swift battery
SPARE Alpkit Blip rear LED light
Bloc Titan Photochromic glasses with reading inserts
Additional mandatory first aid supplies
Footcare kit
High Five electrolyte tablets
And for charging at check points:
Anker USB mains plug
Leads for USB C, USB Micro, Lightning and Garmin Fenix
And for sleeping in at check points:
Cumulus Quantum 450 sleeping bag
Alpkit Drift pillow
(Sleeping mat recommended as beds aren’t always available)
And for changing into and travelling home in:
SPARE OMM Core Plus Hoodie
Fleece trousers
Crocs
I’ve had an early version of this very popular pack for well over ten years now and it’s my go to rucsac for mountain walking days in all seasons bar full winter. The thing most immediately noticeable is its light weight of just over a kilo – remarkable given the array of features it sports.
The Talon 33 is a traditionally designed pack in that it top loads – most other sizes in the Talon series utilise zips for access. For me, a zip is potentially just another thing to fail – a strapped top lid is foolproof and durable. Many modern technical packs these days don’t feature traditional side pockets to keep them compact in shape and the Talon 33 reflects that but has a large stretch stash pocket on the front of the pack and smaller mesh ones on each side. The first is great for stuffing a shed clothing layer into for easy access when you cool off and I’ve used the side ones for my Kahtoola Microspikes and to keep poles in place although they will need covers on the spikes.
I generally use a hydration system – choice for the last ten years has been Source’s excellent 2 litre Widepac unit although Osprey themselves offer their own brand items. Storage in the rucsac for such systems is unique in that they reside essentially outside of the main body of the pack and access to clean and fill is easier than any other rucsac I’ve ever used.
The harness is micro adustable for every back size although you do need to initially pick from either a Small/Medium or Large/Extra Large. Fine tuning after that is achieved with a very clever floating shoulder system which velcros into the position of your choice and then stays silent and immovable. There’s just one compartment in the main body of the pack – I use an Exped pack liner to guarantee that my contents are kept waterproof. However, on the lid, there are two zipped pockets – one on top and one hidden underneath. These are superb for essentials such as snack bars, a head torch, midge repellent, first aid kit, hat and gloves etc – ie, the things you might need to get at quickly. Once again, I use a smaller Exped liner to protect the the top lid pocket. You can buy ‘waterproof’ rucsac covers but I’m not a huge fan as rain can still find its way in around the area next to your back and they can flap badly in the wind.
The pack now comes with a clever walking pole carrying system to allow you to deploy them without stopping to remove the pack – my version is older so came without this. Even so, carrying poles conventionally and an ice axe if required is catered for with twin loops at the bottom of the pack and shockcord securing devices at the top. In reality, I use the side compression straps and one of the stretch side pockets to secure a pair of poles – cover the sharp tips of the poles with a small sleeve of inner tube rubber and that’s a great carrying system.
The comfort level of the pack is very high with anatomically excellent shoulder straps and hip belt – weight is distributed well between them. However, being so lightweight and devoid of a frame it’s very dependent on you packing well as any lumps in contact with your back will be felt – particularly if you don’t have the buffer of a hydration pack. When sized properly and packed sensibly, I can honestly say that I’ve never had a more comfortable pack and have carried it for long distances with fairly heavy loads on occasion. Perspiration where contact is made with the back of the pack is handled decently by a breathable foam without the need for an air gap type frame.
The trade off for the pack’s light weight is that the outer material isn’t quite as durable as those rucsacs of twenty to thirty years ago that some folk will still be using. If you treat your pack super hard then a heavier, more basic model might suit you better. But I’ve walked, run and climbed with mine and despite looking a bit scruffy now, it’s coped very well.
There are many other clever features to the pack – I’ve included a link to Osprey’s website so you can check them out in more detail. The capacity works well for long days on the mountain when extra safety kit and clothing might be carried – I often pack a 30 metre thin rope and 2 man survival shelter for more technical terrain and the pack swallows them with ease along with the usual mix of hiking kit. Some might think the price is high for a day pack – I personally think that for the technicality and function offered it’s very reasonable and treated fairly should last many years.
I own a couple of other Osprey packs which are specific models for ski touring and multiday back packing. The quality is second to none and provided you can navigate the fairly complex array of different models and sizing advice on their website, you should find a fit that’s secure, comfortable and distributes load effectively.
My faithful Talon 33 is looking a bit second hand these days after many years of abuse. But if I do replace it, it’s likely to be with another one – a testament to a cleverly designed and well built piece of kit…
Anyone who’s followed the Mountainfeet Facebook page for enough years will probably have picked up on my brand loyalty to Petzl – particularly where it concerns their head torch product. But along has come a manufacturer to severely test that allegiance, if not break it. That said, my inventory of Petzl head torches are dear to me and will still be getting plenty of usage when applicable and also carried as light weight spares…
Having been training more and more at night, I’ve been finding that my current Petzl torch, the Swift RL, has suffered with shortish battery life. This is particularly noticeable during the colder months of the year when the battery pack is exposed to low temperatures. On a recent round of the Yorkshire Three Peaks, I replaced the battery three times in under eight hours, despite using the torch on only its middle power setting.
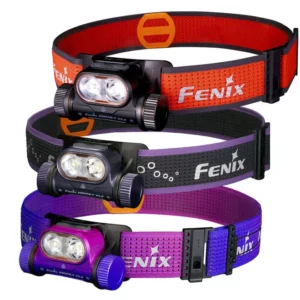
A bunch of outdoor colleagues have sworn by the Welsh manufacturer Fenix UK, so I contacted their marketing officer Jamie Bowen who was incredibly helpful and advised that the latest version of their trail running specific head torch, the HM65R-DT would be my best bet. Several friends active in the mountaineering world have the tried and tested HM65R model which differs slightly and has a full ‘around and over the head’ strap system unlike the headband only DT version. It’s worth pointing out that now (as of December 2024), there’s a new version of the torch called the HM65R-T v2 which is pictured and looks slightly different to the one reviewed here.
Key to my needs is the HM65R-DT’s battery which is removable and rechargeable both in and out of the torch provided you buy the additional smart charger. It’s a 3400 mAh lithium-ion button top battery that looks like a huge AA type and apart from being over 1000 mAh higher in capacity than the Swift battery, it’s cheap to replace or buy more spares. There are also two 3500 mAh versions available, one of which can be connected directly to a regular phone charger or power pack. Fenix claim a 12 hour life for the torch while running at a constant 400 lumens and this seems to be backed up by various unrelated reviewers. Given that 400 lumens is more than adequate for most running and hiking needs, I’m expecting to get a full winter’s night’s activity completed on about one and a half batteries with ease. To be honest, I’ve used it on the moors quite happily set to just 130 lumens with the odd burst of 400 and 1300 lumens to spot distant features, so I can easily imagine a full night with no need for a battery change.
This brings me on to the head torch itself. First impressions are of its almost industrial build quality – it’s highly unlikely that you’ll break this beastie in a hurry! Slight downside to this durability is the unit’s weight compared to the smaller and lighter Swift but it’s something you seem to get used to quite quickly. The body is built from magnesium alloy and the whole torch is IP68 dust and waterproof rated – a very reassuring quality for UK use, as is its two metre drop resistance. The Petzl Swift RL is IPX4 – a lower rating that doesn’t cover total immersion from say, being dropped in a stream.
Looking to the front of the Fenix unit, you’ll see two distinct and separate lamps. This is where it takes a little time to get your head around what’s what, but bear with me…
Fenix don’t go in for adaptive or reactive lighting such as features on several Petzl models and to be honest, this is no great loss in my humble opinion. The main purpose behind such technology is to save battery life by attempting to never oversupply more brightness than is needed. In reality, I still find myself fiddling around with the Swift’s various settings to get an optimum beam, so it hasn’t done away with the human button input entirely. This brings me back to the Fenix which provides two very unique light beam patterns and strengths from the different sized LED’s to fine tune the torch for all situations and terrains.
What you get in the HM65R-DT are separate spotlight and semi spotlight beams. I find Fenix’s description of the two beams a bit confusing but don’t worry, it doesn’t detract from the function of the torch in the slightest. But to me, a spotlight would be a narrow, focused beam and a semi spotlight more of a flood light with a wider angle. If you read Fenix’s website blurb, they describe it as the other way around – at least to my mind. So, there’s a fairly narrow angle, quite orangey coloured light running in three increments of 5, 130 and 400 lumens. You might ask what use to man or beast is five lumens but in this mode, it’ll last you till your hair turns grey or to get you home and is also good for more covert work in the absence of any red LED’s.
The idea of tinting this LED a warm, slightly orange colour, (what they call warm white) is to allow the light to penetrate rain, snow, mist and fog better without bouncing back. In practice, when bounce back or cold breath flare becomes an issue, I usually just hand hold the torch at waist level – a handy tip if you didn’t already know it! But another spin off benefit is that you always know which of the two LED’s is lit – just from the colour. Paradoxically though, it is possible to combine beams – supposedly for the best of both although in practice I don’t really see the advantage.
The other lamp (bright white) runs from 130 through 400 to a rabbit roasting 1300 lumens. This would be what I would consider more of a flood beam as it has a wide peripheral reach. I suspect Fenix call it a spotlight because it has a very defined edge. On their previous but still available trail running model, the HM65R-T, this beam is even wider angled. Fenix have reduced it on the HM65R-DT and I think it’s bang on for open moorland and enclosed lanes alike. The 1300 lumens setting should probably be looked on as an occasional use only asset – partly because of the inevitable drop in battery life and also because even the best quality high lumen LED’s generate a lot of heat. Consequently, the best torches (this one included) have circuitry built in to drop the power down after a period of time to prevent overheating occurring. However, this is a brilliant (pardon the pun!) weapon to have should you be searching for a navigational feature or stile on the far side of a field. Whilst talking technically, this head torch utilises circuitry that runs every brightness mode bar the lowest at its full power until the battery dies. This is far better than cheaper torches that just fade gradually as the battery weakens – the only downside is you need to monitor the battery situation to avoid being left high and dry! That said, the likelihood is that even after there’s no juice to fuel the 130 lumens and above beams, you’ll probably still get a few hours at the emergency five lumen level – will report back soon on that…
Switches for the two lamp beams are separate and sit either side of an easy to read battery level indicator. Some have mentioned the buttons being slightly fiddly but I’d rate them as more positive in feel than the Petzl Swift RL and the Petzl Reactik’s I also own. The deal maker for me over the Swift is the button locking feature to make sure they don’t switch on accidentally in your pack. The Swift has a sliding button affair which three times now has unlocked itself with movement in my rucsac, resulting in flat batteries. The Fenix uses an excellent system that involves pressing both buttons together to lock the torch in the off mode. This is a bigger deal than some might think, many years ago, a friend had a non branded LED torch cause a serious fire in his house through coming on in a pack!
Comfort and ease of adjustment is always a big part of what makes a merely good head torch excellent. In this, Fenix have gone ballistic in one sense of the word to provide a wide, comfortable, reflective and breathable headband which has a one handed BOA adjusting gizmo such as is now tried and tested on certain mountaineering boots instead of conventional laces. As fed back to Fenix, I have twin thoughts on this – certainly, for snugging up the headband around your head gear in fine increments it works fantastically. And the adjustment/release wheel is quick and easy to operate with gloves. But I’d have liked to see an option for a simple, slide adjusted headband too – sometimes in my line of work and play I have to repeatedly take off and put back on a head torch. The BOA system relies on a strong twine like cord running over the elastic headband and once in position isn’t noticeable against the head as the main strap cushions it perfectly. But it needs readjusting every time it’s re-donned and that’s a faff when doing it repeatedly. Maybe this is something Fenix could either offer as an option or even enclose with the torch so the buyer could choose?
Battery replacement is a little more fiddly in the field than the Swift but then again, I’m not expecting to be doing it very often! For regular use, the supplied battery will be all most people need for their activities and when back at base, the head torch as a whole can be plugged in to your favourite USB wall charger using the supplied USB C cable. No need to remove the battery at all for most applications. But if like me, you might be needing light for 14 to 15 hours during winter nights, spare batteries such as the original cost only £22 – a far cry from the Petzl Swift’s spare battery RRP of £55 or thereabouts! But a tip from me would be to buy the slightly more powerful (and expensive at £27) Fenix 3500 mAh USB Micro battery which can be charged using your regular phone charger or power pack and then carried as a spare.
To summarise, I’m completely sold on the Fenix HM65R-DT and it’s going to be my go-to head torch now for many activities. Don’t let the ‘trail running’ label on the product prevent you buying it if hiking only is your thing, although you could look at the standard HM65R also. Price is competitive at an RRP of £110.95 for such a high spec product and it’ll likely serve you for many years. There’s also an engraving service for £2.99 so you can have your name and mobile etched on the body in case of losing it.
So, loads of positives to fire you up, and the one minor niggle in my mind is the lack of a simple head band as an option for certain uses.
Backpacking in the UK has probably never been so popular and given Mountainfeet used to sell tents when we were based in Oldham, our interest in the latest product is still high.
Lately, Si, Lizzie and Gyp have been testing a few of the most popular back packing tents on the market. One of the best value for money two person tents has to be Wild Country’s Helm Compact 2 which is very much designed for the UK’s unique weather!
Si took time to pitch one in breezy conditions on Pule Hill and Lizzie stoically filmed his efforts. Hopefully, the result might be of interest to any of our Mountainfeeters who are already into or getting into backpacking…
A while ago, Si posted a short article on our Facebook page suggesting what was prudent to carry for a winter months walk in the hills or mountains. Here it is as reference for website readers and potential clients:
Just because we’re getting into the winter months doesn’t mean we should have to cut down on our mountain adventures! But we do need to adopt different attitudes to planning, what we attempt and the gear we carry and wear. Today, Si will share what he carries in his rucksack for a day out in the mountains…
“In my experience, there’s a balance to be found between carrying too little and too much on a mountain walk. Too little seems to be the norm these days and we see folk suffer when an unforeseen situation presents itself. However, I also occasionally see a mountain enthusiast carrying a pack so big and overweight that it jeopardises their chances of covering distance over difficult terrain.
This article is just a rough guide but is the result of years in the mountains and lots of fine tuning. I’m mindful of the fact that many folk will be on tight budgets but I still can’t stress enough the importance of buying quality and preferably lightweight kit.
Around our locality, access to the hills tends to be easy – from car park to first climb may only be a few hundred metres or so. Probably for that reason, we’re seeing many day walkers carrying very little in the way of ‘what if this happens?’ type gear. This means that in the event of an issue, particularly one where they’re rendered immobile, self rescue is often impossible and help from others becomes necessary. Some of the kit I carry may not only assist me in an emergency but equally could make a big difference to someone else I come across.
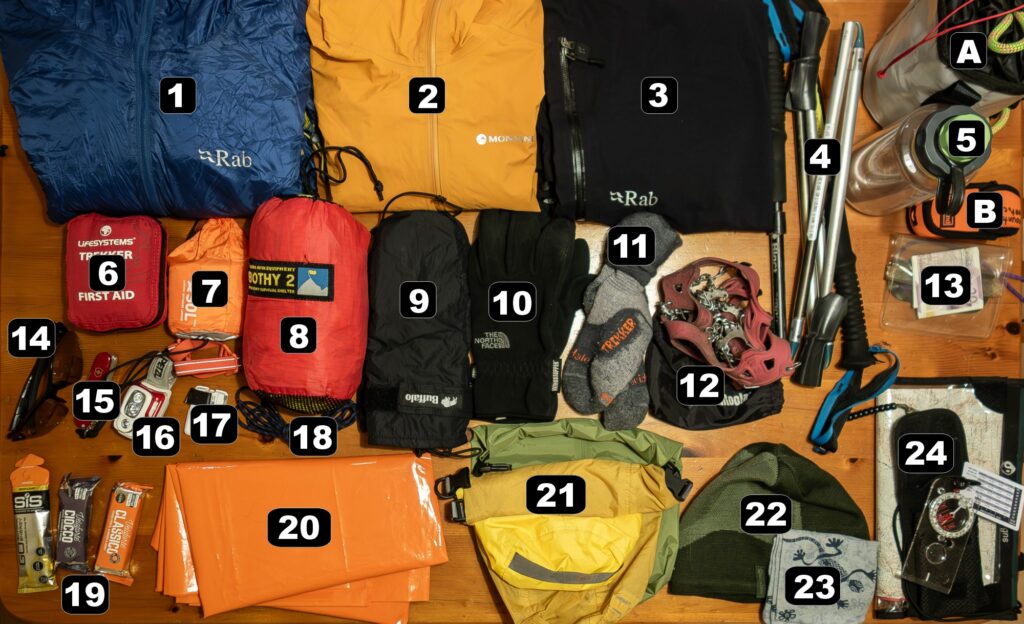
Some might feel that the pack contents illustrated are more than are needed for their activities and I respect the choice of the individual. There are a few items in the image that are ‘optional extras’ and would only be carried on certain routes that might involve scrambling, wintry weather or more remote terrain. All I’m attempting to do is to present a ‘toolkit’ for the mountains that can cover most eventualities.
OK, let’s look at it all in detail…
1) An insulative mid or outer layer for when not moving. Best to be a synthetic fill as unlike down jackets, they still perform when wet. This means that in an extreme situation, you can throw it over other already soaked clothing and it will still retain warmth.
2) The all important waterproof and preferably breathable jacket. Even if you think it won’t rain, it should still be packed as it’s also windproof and will retain body heat in an emergency.
3) Waterproof and preferably breathable overtrousers. These should be capable of being donned without taking your footwear off – three quarter or full length zips are the easiest to put on.
4) Walking poles. These can be a controversial item to advise on and are an individual preference. No longer seen as just for ‘old people’, most mountain professionals not only use them but recommend them for their clients. I’m an occasional user of them so have as light a set as possible that fold shorter than my pack height. If you carry a longer set on the outside of your rucsac then ensure the tips are protected and don’t project upwards into other walker’s faces!
I also wrap a few turns of Gorilla tape (or duck tape) around the top of the poles for repairs – this is an old ski touring trick!
5) Water container or carrying system. The Nalgene bottle in the system is my preferred way of carrying water in freezing conditions as it stows in the pack (outside of the waterproof liner) and stays warm. However, I’m a big fan of soft reservoir systems such as Camelbak and Source in warmer weather when two plus litres of water may need to be carried and accessed quickly. In heat, it’s also a good idea to add some flavoured electrolyte tablets to help replace body salts – my favourites are Nuun tablets as they taste good!
Also worth carrying is a water filter ‘soft’ bottle such as the Salomon XA Flask. I often use this to cut down on weight of fluid carried as you can fill it from streams and drink straight away.
6) A first aid kit of some description should always be carried – if not for yourself then for those you may come across. Keep it basic as improvisations can be made with clothing when it comes to slings and bandages. It’s worth carrying blister and insect bite treatments together with a couple of puritabs to sterilise stream water should you run out of what you’re carrying. Make sure the kit has plasters & dressings, sterile cleansing wipes, toughcut scissors, eyewash and nitrile gloves. I also carry paracetamol for my various aches and pains – personal medications should be carried but not administered to others. Most good lightweight mountain first aid kits such as those made by Lifesystems also have basic primary care advice leaflets to guide you through a trauma.
7, 8 and 20) These are all variations on the theme of a survival bag and I sometimes carry all three! I’d recommend at the very least a light weight and minutely packable foil emergency bivvy bag (7) such as is made by Lifesystems or Sol is carried – it could save your or another’s life. Don’t be tempted to buy a foil blanket – they’re next to useless! The larger storm shelter is useful for waiting out foul weather, particularly if you’re with others – they’re available in two person right up to eight or ten person versions! Mine is a two person type big enough for myself and Gyp to chill out in.
The classic orange heavy gauge polythene bivvy bag (20) is better than the foil bag if you have room and is reuseable. I like to carry one to spread out and sit on for resting and eating if with other folk. In foul conditions or an emergency you can literally just climb in and feel the heat start to build around you.
9 and 10) Good gloves are vital in winter. A simple fleece or power stretch glove is easy to put on when it gets cold and can be wrung out when wet and still insulate. I prefer a windproof version as per item (9). Steer clear of gloves with a loose liner – they can be impossible to put on when your hand’s wet! You need something that will work in wet conditions – Buffalo mitts are good and easy to put on. They seem expensive for what they are but have saved my hands from frostbite a couple of times. For full on winter work I carry heavier duty gloves and mitts.
11) Another optional extra is a spare pair of socks – useful for changing into if your boots leak.
12) Micro spikes. Generally only carried during winter time and in icy conditions but also very useful on wet grass, slippy stone, stream crossings and muddy paths. I think these are a game changing piece of kit – most people only feel they need them after having a winter nightmare by which time they’ve often sold out. There are many varieties including the cheap and cheerful Yaktrax which weigh very little. For me however, there’s no other choice than Kahtoola Microspikes – the fact they’re issued to most Mountain Rescue team members speaks volumes and I carry them year round.
13) Phone in waterproof case. Most folk have a mobile phone these days and despite some traditionalists decrying them you’d be bonkers not to carry it! But there’s no point having it unless it’s fully charged and you know how it can best help you on the hill. Finding a signal in the hills used to be almost impossible but coverage is getting better all the time now – EE seems to work best in the mountainous areas. You can sign up to the 999 text service which will transmit an emergency message over a weak signal where no voice can be carried. The phone can often be tracked by Mountain Rescue teams in order to locate you if lost or in distress.
In addition to the phone, a separate power bank to recharge it is strongly advised. Alpkit do a little beauty called a Juice Boost which gives 5,000mAh and has USB micro and USB C leads built in. Amazon sell USB C to Lightning adaptors to ensure you’ve got all bases covered or you can plug a Lightning or Garmin watch lead into to the Juice Boost’s separate USB slot. The power bank will also come in useful if your head torch battery runs low.
There are many mobile phone apps out there to assist with navigation and to summon help – I’d recommend at least a basic subscription to OS Maps for planning and navigation plus the free OS Locate to pinpoint your position to relay to emergency services. There’s also an app called UK Maps which is far better featured than OS Maps albeit it takes time to get your head around! But this has many features for more accurate navigation and after the initial small purchase price, the excellent OS VectorMap based mapping is free to use.
Always make sure you download the necessary mapping for the area your route takes so it’s available ‘offline’ and will still display when out of signal. Relying on Googlemaps or similar basic online only phone mapping has got many folk into trouble. Of course, you could invest in a dedicated GPS with on board mapping, such as those produced by Garmin.
14) Some form of eye protection for sun, rain, hail and snow. I use Bloc Titan photochromic sport glasses which work well in virtually all light levels. Don’t forget some reading glasses too if you’re an old gimmer like me!
15) A small penknife such as a Victorinox Spartan.
16) Headtorch. This is a vital piece of kit on short winter days in case of finishing your route in the dark or being be-nighted. Don’t rely on your phone torch – it’s not bright enough and could run the battery down just when you need the phone for emergency purposes.
17) Spare batteries for headtorch.
18) Spare boot laces – 150cm or longer to fit all footwear. Also useful for making repairs to kit.
19) Food. Make sure you carry enough calories to see you through the day and beyond if there’s a problem. The bars and gels in the photo would usually be supplemented by some ‘real’ food such as sandwiches. On really cold days it’s also good to carry a small flask containing a warm drink or soup.
20) Heavy gauge polythene bivvy bag as previously mentioned.
21) An assortment of dry bags to keep pack contents waterproof. Not shown is a large rucsac liner bag (literage should be bigger than pack) that protects all the kit apart from the water bottle and poles from wet weather. Ortleib make an excellent range of such roll top bags but for those on a budget there are plenty of alternatives online or you could use strong bin liners.
22) Beanie hat for cold weather.
23) Neckgaiter for pulling up over face in serious conditions. Buff are a market leader in these garments.
24) The all important map and compass. Often the last resort for many when navigating but not reliant on batteries, signal or delicate technology. Mine generally stays in my pack as I navigate using GPS technology but every so often I practise with the map and compass. No point carrying the items if you don’t know how to use them!
A. 8mm x 20 metre ‘confidence’ rope. Only carried if on terrain where a fall would have serious consequences. If taken, stow it in a small deployment bag rather than loose in coils that are likely to tangle if needed in a hurry. Learn the basic techniques for protecting yourself and others – simplicity is key and you shouldn’t need additional slings and carabiners in a walking/basic scrambling environment.
B. If you’re operating in a really remote area where there are known phone signal issues, you might want to invest in a personal locator beacon (PLB) that will summon help through a satellite link. The model illustrated is a McMurdo Fast Find 220.
All of the above went into this 25 litre rucsac.
The day pack size you use is down to personal preference and might range between 20 and 35 litres depending on how much of the above kit is carried and where your route takes you. When I need the whole shebang and want to carry copious amounts of food and water with maybe a flask too, then I use a 33 litre Osprey Talon pack. But just to illustrate you can go smaller with the right choice of equipment, my photo below shows ALL the listed kit in just a 25 litre Montane Trailblazer rucsac which I use on a weekly basis for both walking and running in the hills and mountains.
Not shown is the whistle I always carry attached to the pack. If all else fails – six blasts on the whistle repeated at intervals may alert rescuers. Even if you know help is on its way it’s worth continuing to signal in order to guide personnel in to you. After dark, use your torch to give six flashes to achieve the same effect. These measures should be taken if no phone signal is available.
Hopefully this article will give aspirant mountain walkers a framework of the gear needed to keep themselves safe and self reliant. Some of the kit might never need to be used in anger but is there as an insurance policy. With decent planning, navigation and an awareness of situation, it’s unlikely that an issue will present itself that can’t be comfortably handled with the equipment outlined above…”


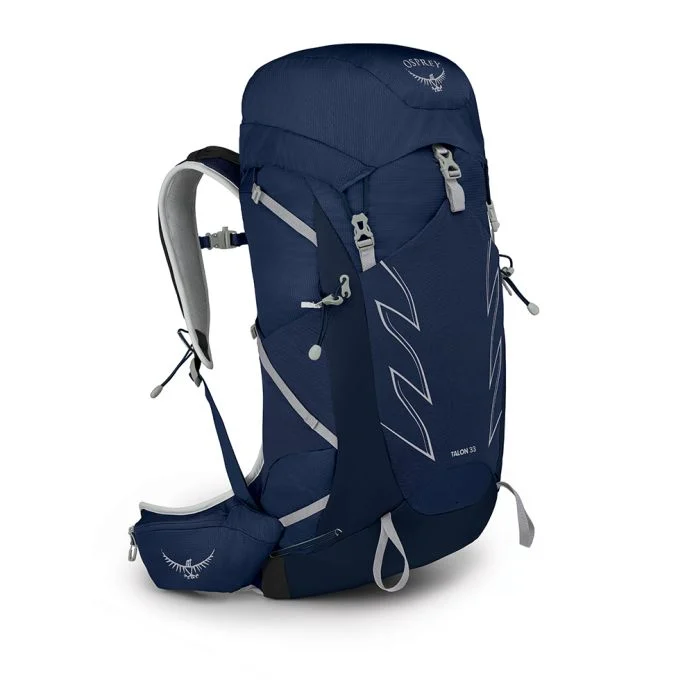
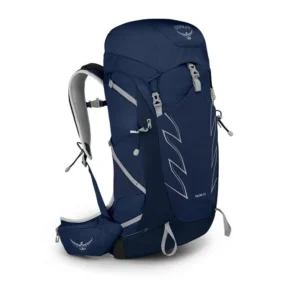 The Talon 33 is a traditionally designed pack in that it top loads – most other sizes in the Talon series utilise zips for access. For me, a zip is potentially just another thing to fail – a strapped top lid is foolproof and durable. Many modern technical packs these days don’t feature traditional side pockets to keep them compact in shape and the Talon 33 reflects that but has a large stretch stash pocket on the front of the pack and smaller mesh ones on each side. The first is great for stuffing a shed clothing layer into for easy access when you cool off and I’ve used the side ones for my Kahtoola Microspikes and to keep poles in place although they will need covers on the spikes.
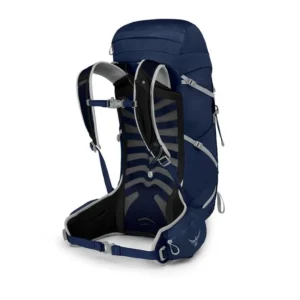 The harness is micro adustable for every back size although you do need to initially pick from either a Small/Medium or Large/Extra Large. Fine tuning after that is achieved with a very clever floating shoulder system which velcros into the position of your choice and then stays silent and immovable. There’s just one compartment in the main body of the pack – I use an Exped pack liner to guarantee that my contents are kept waterproof. However, on the lid, there are two zipped pockets – one on top and one hidden underneath. These are superb for essentials such as snack bars, a head torch, midge repellent, first aid kit, hat and gloves etc – ie, the things you might need to get at quickly. Once again, I use a smaller Exped liner to protect the the top lid pocket. You can buy ‘waterproof’ rucsac covers but I’m not a huge fan as rain can still find its way in around the area next to your back and they can flap badly in the wind.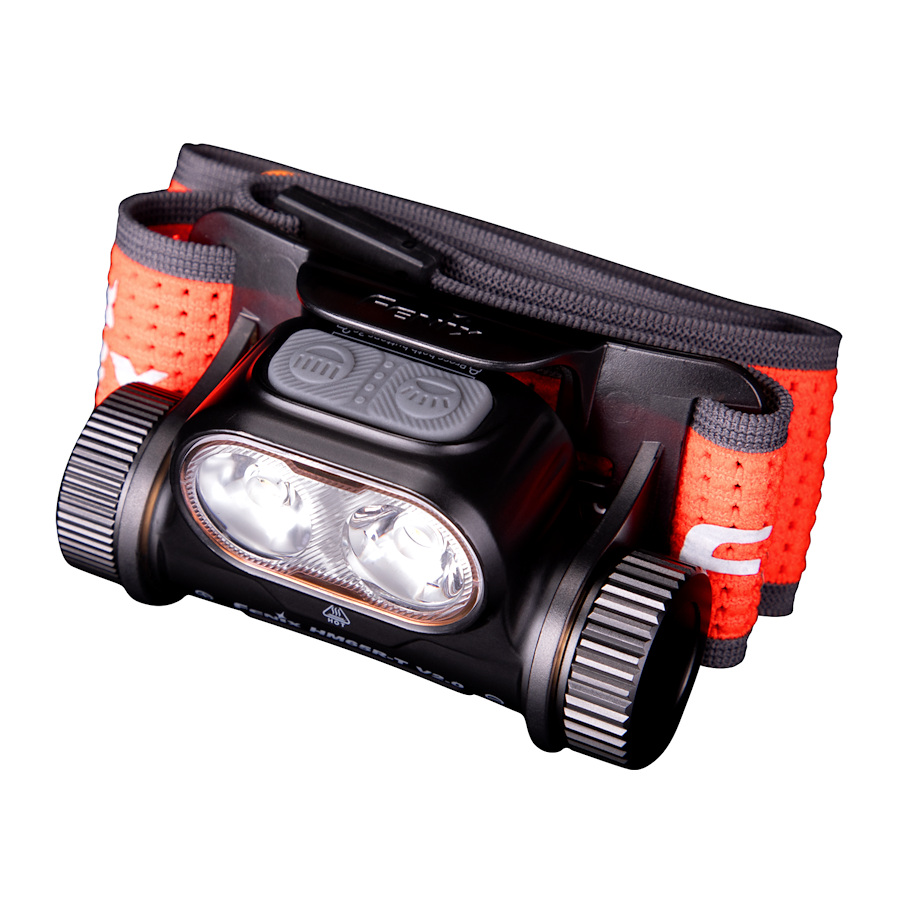
 The other lamp (bright white) runs from 130 through 400 to a rabbit roasting 1300 lumens. This would be what I would consider more of a flood beam as it has a wide peripheral reach. I suspect Fenix call it a spotlight because it has a very defined edge. On their previous but still available trail running model, the HM65R-T, this beam is even wider angled. Fenix have reduced it on the HM65R-DT and I think it’s bang on for open moorland and enclosed lanes alike. The 1300 lumens setting should probably be looked on as an occasional use only asset – partly because of the inevitable drop in battery life and also because even the best quality high lumen LED’s generate a lot of heat. Consequently, the best torches (this one included) have circuitry built in to drop the power down after a period of time to prevent overheating occurring. However, this is a brilliant (pardon the pun!) weapon to have should you be searching for a navigational feature or stile on the far side of a field. Whilst talking technically, this head torch utilises circuitry that runs every brightness mode bar the lowest at its full power until the battery dies. This is far better than cheaper torches that just fade gradually as the battery weakens – the only downside is you need to monitor the battery situation to avoid being left high and dry! That said, the likelihood is that even after there’s no juice to fuel the 130 lumens and above beams, you’ll probably still get a few hours at the emergency five lumen level – will report back soon on that…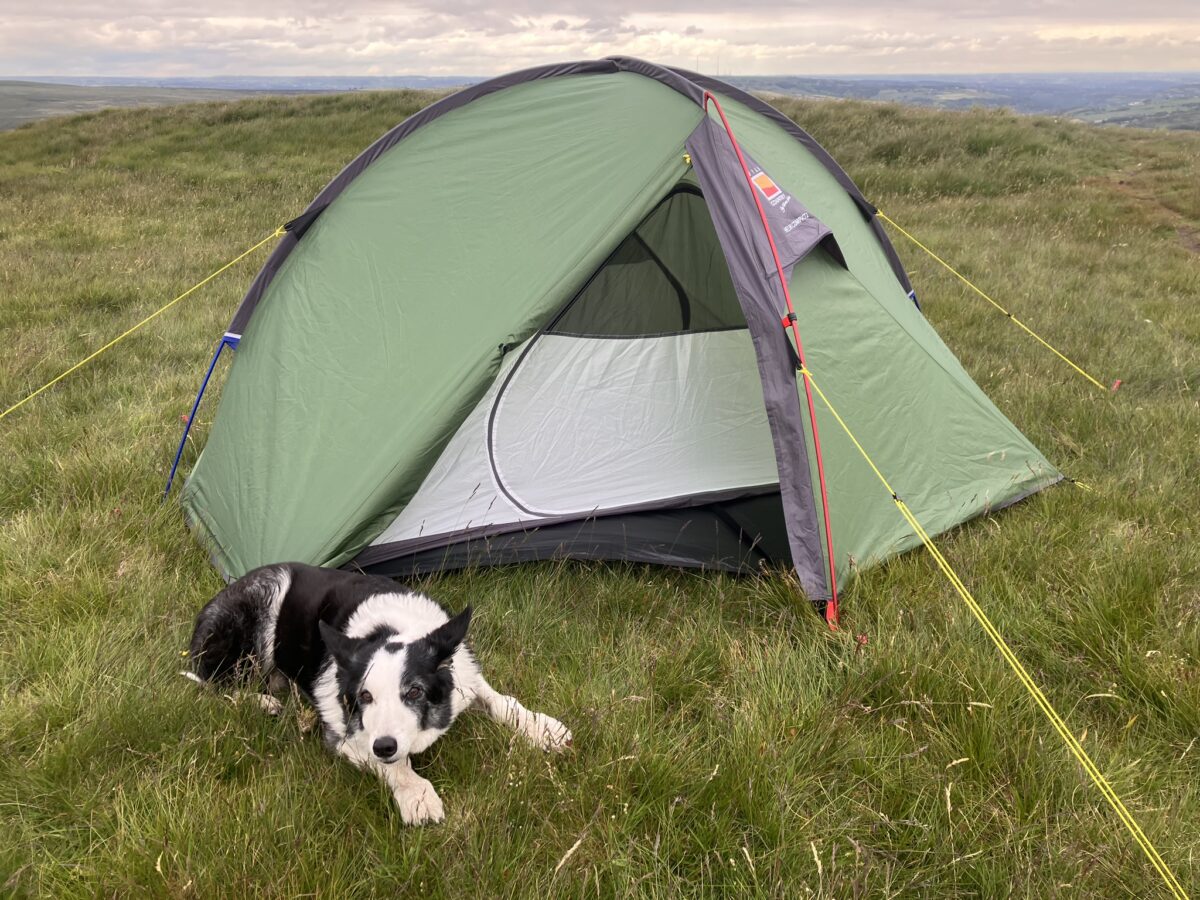
 Backpacking in the UK has probably never been so popular and given Mountainfeet used to sell tents when we were based in Oldham, our interest in the latest product is still high.